Introduction to Docker
Docker is a platform that enables the creation, deployment, and management of applications within lightweight, portable containers. These containers encapsulate an application and its dependencies, ensuring consistent behavior across different computing environments. This approach simplifies the process of developing, shipping, and running applications, enhancing efficiency and reliability.
Installing the Docker Engine
For installation information, consult the official documentation. https://docs.docker.com/engine/install/
Hello World of Docker
In Docker, to execute a "hello-world" container, you simply need to run the following command:
docker run hello-worldThis action will initiate the creation and startup of a container.
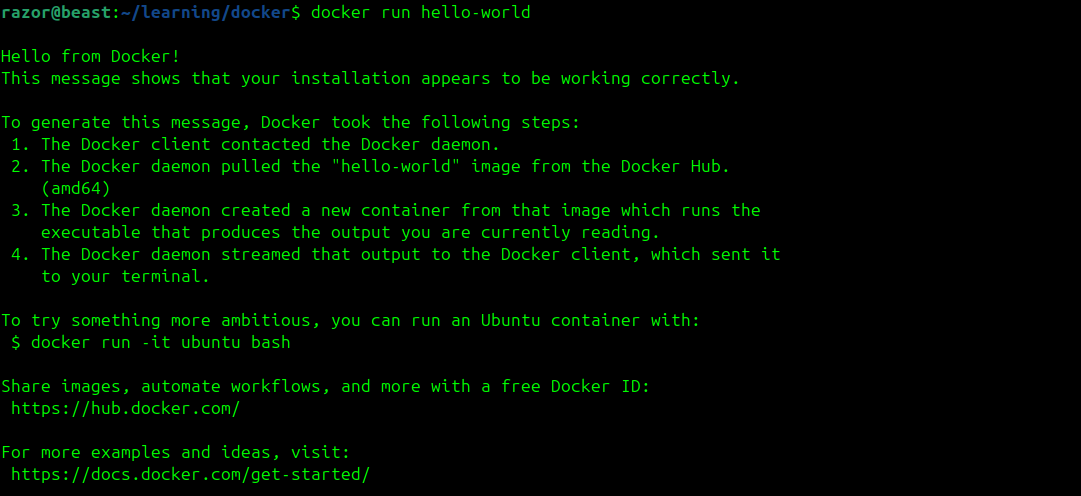
If you see output similar to this, your Docker installation was successful.
Docker Images
Docker images are lightweight, standalone, and executable software packages that include everything needed to run a piece of software, such as code, libraries, and system tools. They serve as templates for creating Docker containers, ensuring consistent environments across different systems.
let us list what available docker images we can use this command
docker imagesWe obtain the following output:

As observed, there is an image in Docker called "hello-world." When we executed the command:
docker run hello-worldthe Docker client on the system retrieves the image from a container registry. By default, if no registry is specified, it fetches the image from Docker Hub, located at hub.docker.com, and then runs it.
Although hub.docker.com is the default, there are numerous container registries such as GitHub's and Google's.
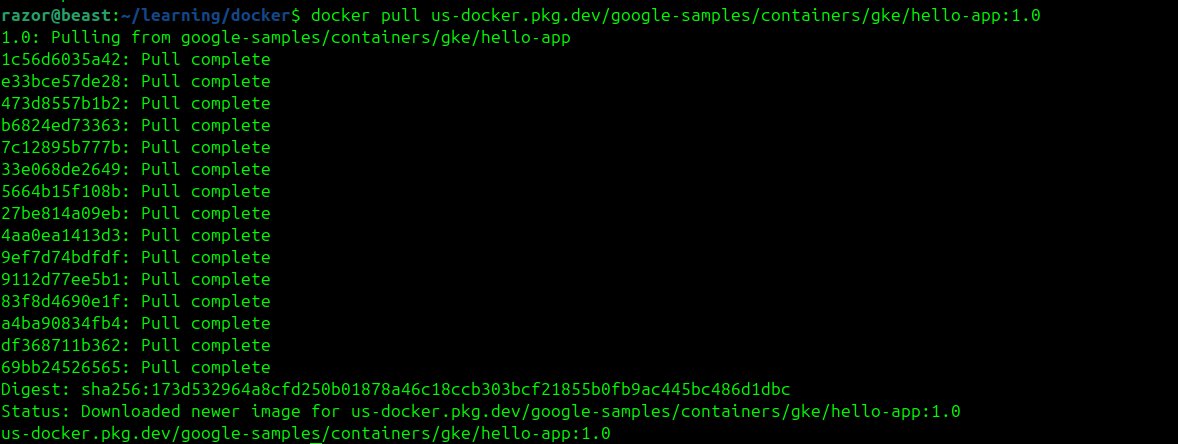
Let's pull a hello-world image from the Google registry.
What is a Container Registry?
A container registry is a storage and distribution system for named container images. It allows you to store, manage, and distribute Docker images. Here are a few examples:
🔹 Docker Hub – The most widely used registry, often compared to YouTube for Docker images. 🔹 GitHub Container Registry (GHCR) – Integrated with GitHub projects for seamless container management. 🔹 Google Artifact Registry (public) – Occasionally hosts public images from Google.
Building Images using Dockerfile
Let's attempt to create an image that includes everything necessary to run a specific software, similar to existing images like those for Nginx or Memcached. For example, consider a Python project that has a requirements.txt file. The image will already have all the required Python dependencies installed, so all we need to do is run the application.
Building The Python Application
First, create a folder named simple-api-server and navigate into it using the following command:
mkdir simple-api-server && cd simple-api-serverThis command accomplishes two tasks:
- Creates a new directory called
simple-api-server. - Changes the current working directory to
simple-api-server.
Next, let's set up a basic Python Flask server that returns a response.
{
	"hello" : "world"
}
Setup venv(Optional)
-
Create a Virtual Environment
python3 -m venv .venv -
Activate the Virtual Environment
source .venv/bin/activate -
Install Flask
pip install flaskCoding the main.py
Here's what the code for that Python application might look like. We'll create a file called main.py and add the following code:
from flask import Flask, jsonify

app = Flask(__name__)

@app.route("/")
def hello_world():
	return jsonify({"hello": "world"})

if __name__ == "__main__":
	app.run(debug=True, port=8000, host='0.0.0.0')
This is a basic HTTP server that sends a "Hello, World!" JSON response when accessed at the root.
The requirements.txt file
The requirements.txt file is crucial in Python projects, especially when it comes to containerization. It lists all the dependencies needed for a project, ensuring that the same environment can be replicated consistently across different systems. This is particularly important in containerization, as it allows Docker and other containerization tools to create isolated environments with all necessary packages pre-installed, facilitating seamless deployment and scalability.
Here's where the benefits of using a .venv come into play. Since we're utilizing venv, we don't need to list the dependencies individually. Instead, we can use:
pip freeze > requirements.txtpip freeze retrieves all dependencies and their versions, conveniently listing them in a file. In our case, it would look something like this:
blinker==1.9.0
click==8.1.8
Flask==3.1.0
itsdangerous==2.2.0
Jinja2==3.1.6
MarkupSafe==3.0.2
Werkzeug==3.1.3
Notice how the version numbers are also stored. This approach is always recommended.
To The Good Stuff : Dockerfile
A Dockerfile is a text document that contains a series of instructions for building a Docker image. It specifies the base image, dependencies, environment variables, and commands to set up a containerized application.
It serves as a blueprint for creating consistent and reproducible environments, ensuring that the application runs the same way across different systems.
# Use the official Python 3.11 image based on Alpine Linux for a lightweight base image
FROM python:3.11-alpine

# Set the working directory inside the container
WORKDIR /app

# Copy all files from the current directory to the working directory in the container
COPY . .

# Install the required Python dependencies listed in requirements.txt without caching
RUN pip install --no-cache-dir -r requirements.txt

# Specify the command to run the application
CMD [ "python3", "main.py" ]
FROM
The FROM command is utilized to designate the base image for the container. There are numerous base images available, such as Alpine, python3:11, and others. We can select our base image based on our specific needs.
WORKDIR
The workdir command is utilized to designate the working directory. The workdir directive in a Dockerfile specifies the working directory for any subsequent instructions within the file. This sets the context for commands like RUN, CMD, and ENTRYPOINT, ensuring they execute within the designated directory.
COPY
The COPY command in Docker facilitates the transfer of files or directories from the host system to the Docker image during the build phase. This is crucial for incorporating essential files and dependencies required by the application running inside the container.
RUN
The RUN directive in a Dockerfile is used to execute commands within the context of the image's filesystem during the build process. It creates a new layer in the image for each command, allowing for efficient caching and layer reuse. This directive is essential for installing software, configuring settings, and preparing the environment for the application.
CMD
In a Dockerfile, the CMD instruction specifies the default command to run when a container starts. It can be overridden at runtime, but it provides a convenient way to define the container's primary operation.
docker build Command
The docker build command is used to create a Docker image from a Dockerfile, which contains a set of instructions for building the image. This command reads the Dockerfile and executes each instruction to assemble the image layer by layer, resulting in a ready-to-use Docker image.
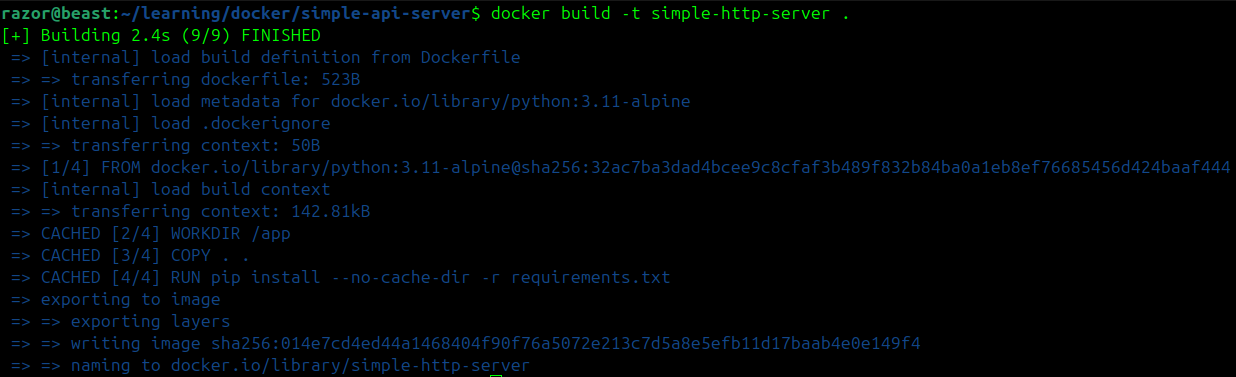
When performing a docker build with the -t option, this option is used to name the image as simple-http-server. The path that follows must specify the location of the Dockerfile, with . indicating the current directory.
Now, we can execute docker images to view the available images.

Running the Application with a Docker Image
Let's execute the application using the following command:
docker run -d --name sussy-baka -p 8000:8000 simple-http-server:latest
-d: This flag runs the container in detached mode, meaning it will run in the background.
--name sussy-baka: This option assigns the name sussy-baka to the container. This name can be used to reference the container in other Docker commands.
-p 8000:8000: This flag maps port 8000 of the host machine to port 8000 of the container. This allows you to access the application running inside the container via port 8000 on your host machine.
simple-http-server:latest: This specifies the image to use for the container. In this case, it is the simple-http-server image with the latest tag, which indicates the most recent version of the image.

A starting message will be displayed on the screen after executing the command 98c4b401a508d7e252186862016e4e26e2ac86a61d084123e194ecd35130363d. This is the container ID of the running container.
We can use this to refer to the container if we need to stop, restart, or even remove it.
Now, when we execute docker ps, we can observe the container in operation.

Let's utilize the curl command to verify that we are receiving a valid response.

As you can observe, we have received a valid response.